My talk at the PHP user group Munich, September 2023
Keeping your PHP dependencies up to date can be an annoying, error prone, repetitive never ending task, especially if working with a multitude of PHP projects.
I want to show my approach to automate this process with GitLab CI, so I am able to update, merge and deploy 8 Laravel applications every Monday morning right before I finish my first mug of coffee.
create a linux partition on an external drive, like Ext4 or XFS
plug in the external drive to store the backup
open a terminal an run backup-home.sh to start a new backup
Result
The backup will create a new folder for the current date in the target directory:
drwxr-xr-x 52 oli oli 4096 Mai  1 13:23 2021-05-01
drwxr-xr-x 52 oli oli 4096 Mai  2 08:14 2021-05-02
drwxr-xr-x 52 oli oli 4096 Mai 13 09:26 2021-05-13
drwxr-xr-x 52 oli oli 4096 Mai 16 09:27 2021-05-16
drwxr-xr-x 52 oli oli 4096 Mai 23 08:27 2021-05-23
drwxr-xr-x 52 oli oli 4096 Jul 25 08:52 2021-07-25
drwxr-xr-x 52 oli oli 4096 Aug  8 09:19 2021-08-08
lrwxrwxrwx  1 oli oli   58 Aug  8 09:39 last -> /media/oli/Seagate_4TB/Backup/vostro/rsync-tool/2021-08-08
Every folder will contain a full copy of the source directory at the respective date, but will require just the storage space of the new and changed files. All unchanged files will be hard-linked, so they will just use an inode.
Even on my 10 years old Laptop with USB 2.0 the backup of the home partition takes just some minutes, due to the efficiency of rsync
Projects/html/oliworx.github.com/.git/refs/remotes/origin/master
Projects/html/oliworx.github.com/.github/workflows/
Projects/html/oliworx.github.com/.github/workflows/website.yml

sent 142,744,045 bytes  received 44,245 bytes  574,600.76 bytes/sec
total size is 266,349,471,150  speedup is 1,865.35
oli@mx:~$
Fast and efficient backup of XFS partition
If you are using the XFS filesystem for your Linux partition you can create full and incremental backups with the powerful tool xfsdump.
I am creating a backup of my home partition like this:
Let’s have a detailed look on the used commands and parameters:
sudo : the xfsdump command is only available with root privileges
xfsdump : is doing the heavy lifting of dumping the filesystem
-l 0 : we want to do a level 0 backup, not an incremental backup
-L "Backup level 0 of /home `date`" an optional label for the dump
- : to write the dumped data to STDOUT instead of a file
/home is the mount point of the XFS partition
|lzop put the dumped data into the lzop compression program
> /backup-dir/home-xfsdump-`date +%Y-%m-%d`.lzo save the compressed dump data in a file with a descriptive name (what, how, when)
lzop will compress the filesystem data with minimal CPU usage and not slowing down your backup procedure at all, the limiting bottleneck will probably be your backup storage (external USB drive or network storage):
You probably have to install xfsdump and lzop first:
sudo apt install xfsdump lzop
Now you also have the xfsrestore command, which you will need to restore the filesystem from the backup:
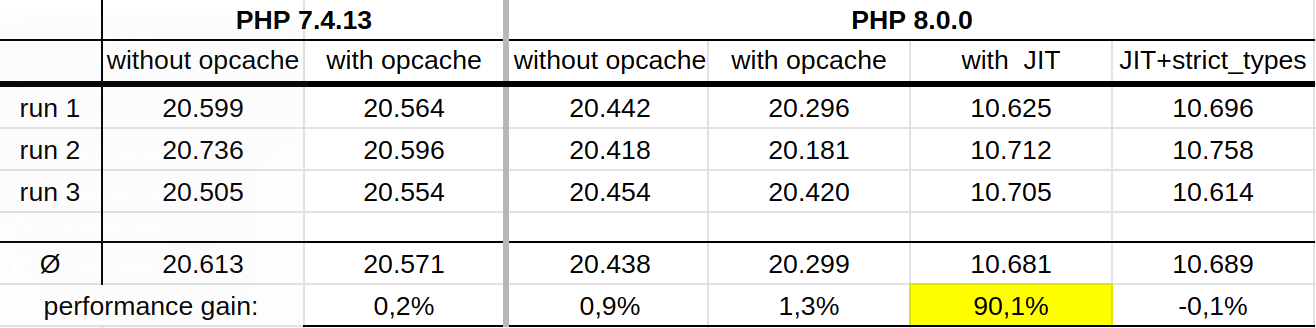
PHP 8.0.0 introduced a new “just in time” compiler (JIT) that can improve the performance of our PHP applications. But the JIT is not active by default. So how can the JIT compiler be activated and what is the performance gain?
These ini-file settings will activate the opcache and the JIT compiler with some more reasonable default settings:
Here I want to test the performance gain with a small script, that will calculate the prime numbers up to 100 mio using an implementation of the Sieve of Eratosthenes. It will not output each prime number but rather count all the prime numbers up to the given upper limit.
<?php$tStart=microtime(true);$limit=100_000_000;$nums=array_fill(0,$limit+1,1);$sqrtlimit=(int)sqrt($limit);for($n=2;$n<=$sqrtlimit;$n++)if(1===$nums[$n])for($i=$n*$n;$i<=$limit;$i+=$n)$nums[$i]=0;$duration=microtime(true)-$tStart;echoarray_sum($nums)-2."\n";// 0 and 1 are not primesechoround($duration,3)." seconds\n";
I did a couple of test runs, with PHP 7.4 / 8.0, without opcache and with opcache, without and with JIT compiler and also with strict_mode:
Running with PHP 8.0 and active JIT compiler
>php8.0 prime-sieve.php
5761455
10.614 seconds
Seems like it doesn’t matter if we are running PHP 7.4 or PHP 8.0 with or without opcache. But activating the JIT compiler in PHP 8.0 gives us a 90% performance improvement! This is quite a remarkable boost, though in real life code the speed improvement will probably be much smaller, due to more I/O operations like database requests.
Performance comparison of Laravel cache stores
When running a high traffic website with Laravel, caching becomes a critical aspect for performance.
Using the Laravel framework it is possible to use different cache stores, e.g. file cache for development and Redis or Memcached for production servers.
So the question is, what is the best cache store for my use case? To answer this question, I wrote a small PHP script to be run with Laravel Tinker.
By default it will create 100 cache items and perform 20 times more reads than writes to all configured and available cache stores.
To run the Laravel cache benchmark, clone or download it from github.com/oliworx/laravel-cache-benchmark and copy the file cache-benchmark.php to the directory of your Laravel project. You may want to edit some settings in the top section of the file. e.g. disable memcache tests if this cache store is not available in your specific setup.
Open a terminal and in your project directory run:
php artisan tinker cache-benchmark.php
The tests will run for some seconds only, and no caches will be flushed, so it is safe to run on a production system too.
The results from my local Mac/Docker setup (PHP 7.4, Redis, Memcached, MariaDB) are:
Surprisingly the file cache store is as fast as local Redis!
Conclusion: it is a good idea to benchmark the cache performance on a real system, instead of guessing and making assumptions.
40 times faster PHP Code Coverage Reporting with PCOV
For a PHP project with over 100 000 lines of code I want to create Code Coverage Reports on an regular basis, usually every 1 or 2 months.
With the Xdebug enabled such a run of phpunit --coverage-text=report.txt takes ages:
Time: 2.2 hours, Memory: 269.00 MB

OK, but incomplete, skipped, or risky tests!
Tests: 775, Assertions: 2825, Skipped: 1.
It takes more than 2 hours to create the Code Coverage Report!
By using the awesome PCOV PHP extension it was possible to accelerate the process by factor 40!
Time: 3.32 minutes, Memory: 259.00 MB

OK, but incomplete, skipped, or risky tests!
Tests: 775, Assertions: 2825, Skipped: 1.
With PCOV the Code Coverage Report was created in about 3 minutes only!
How to install PCOV in a PHP Docker image
In your PHP Dockerfile add these lines to a RUN directive
pecl install pcov && \
docker-php-ext-enable pcov
and then build your PHP Docker image as usual.
PCOV and Xdebug
Please keep in mind: It is not possible to have Xdebug and PCOV both active at the same time! Xdebug must not be enabled, when PCOV is active.
If you want to debug your code with Xdebug, you first have do disable PCOV. Just set pcov.enabled=0 in a PHP ini file and don’t forget to restart your PHP-FPM or your Docker containers to apply the changes.
Check password strength with vanilla JavaScript and HTML5
Weak passwords are bad and a real danger. So we should encourage our users to use stronger passwords for their online accounts.
Therefore nowadays it is state of the art to give the user instant feedback about the password quality, e.g. on a registration form or a change-password form.
There are great out-of-the-box solutions to tackle this task, like
These packages can even check against known password lists and dictionaries. But on the downside they will add some additional 100kB to the javascript code or even require frameworks like jQuery or Bootstrap.
For my use case this would be too much. I don’t want to bother users with restrictive and complicated password rules. I just want to give a quick feedback about the password strength, based on a few simple rules. So I implemented my own very basic password strength indicator.
Given, we have an html form with a password input:
Each of these elements have an id, so we can easily address it later via JavaScript.
Of course, now we also need a JavaScript function to evaluate the password, it should get the password string as a parameter and return a numeric value as a measure for the password strength.
functionpasswordStrength(pw){return/.{8,}/.test(pw)*(/* at least 8 characters *//.{12,}/.test(pw)/* bonus if longer */+/[a-z]/.test(pw)/* a lower letter */+/[A-Z]/.test(pw)/* a upper letter */+/\d/.test(pw)/* a digit */+/[^A-Za-z0-9]/.test(pw)/* a special character */)}
In this function we check the password input against some regular expressions using the test() method and then treating the boolean return value as a number (0 or 1).
To get the top score of 5 a password must be at least 12 characters long and must have numbers, upper and lower letters and other special characters. Passwords shorter than 8 characters are considered insecure and will get a rating of 0.
Finally we just need some magic glue to connect all the bits and pieces properly. We want to evaluate the password whenever a key is pressed in the password input field and update the password strength indicator immediately:
Feel free to modify the password rules to your needs, add your own rules or some textual output to the user interface.
How to drastically increase Docker performance on Mac and Windows
On Windows and Mac you will probably see a poor performance for your thoroughly dockerized application. This is due to very slow storage I/O operations on your mounted volumes from the local filesystem. On Mac and Windows Docker file has to route file system operations through more layers compared to running Docker on Linux.
If using docker-compose there is a very easy way to speed up the file access and the whole application. Just use the mount options delegated or cached in your docker-compose.yml file like this:
This will create a general purpose database user, that can not only read and write data, but also modify the structure of the database, like ALTER or DROP tables.